Description
In this demo Brian is using a Suhr Alt T. PLEASE NOTE: This video was made with version 1.0 of this patch. Scroll down to see the improvements we’ve made.
This patch re-creates the sounds from the song ‘Glory to Glory’ as recorded by Bethel Music on the album Have It All. It is designed to be used in Snapshot mode, and the snapshots correspond to different song sections.
IMPORTANT NOTES
1. UPDATE YOUR FIRMWARE: Please upgrade the firmware on your Helix and the HX Edit software from Line 6 to the latest before installing this patch. Even if your Helix is up to date, the ‘HX Edit’ app needs to be updated as well. If you get an error importing a patch, the problem is most likely outdated firmware on your Helix/HX Edit. You will need at least firmware 2.8.
2. REVERBS: The 2.6 Firmware update changed the mix levels of the new (HX) reverbs. This patch accounts for those changes, so if you are not updated to 2.6 or later on your Helix, the reverbs will not sound right.
3. IR CAB INCLUDED: This download includes a premium IR from Tone Junkie. We matched this specific IR to this amp, but feel free to experiment with other IR’s for different tonal options. We’ve also included a stock cab version of the patch, but we urge to try the IR – it really does sound better – and it’s included for free :).
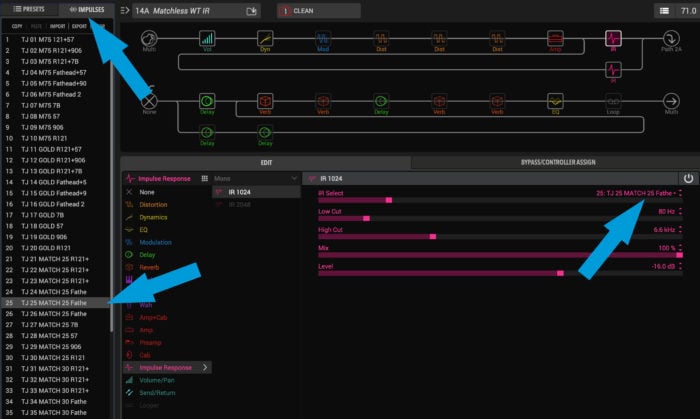
Here is the specific IR included, and its location in our Helix:
- TJ 40 MATCH 30 R121 . In our Helix, it’s in IR slot 40 (this will always correspond with the number after ‘TJ’ in the file name).
To purchase more IR packs, visit the Tone Junkie store here.
HOW TO IMPORT THIS PATCH AND IR
- Connect your Helix to your computer using a USB Cable
- Download and instal the ‘HX Edit’ app from Line 6
- In the ‘HX Edit’ app, drag and drop the patch into a slot in the ‘PRESETS’ column
- To import an IR, switch to the ‘IMPULSES’ column (next to the PRESETS column), and drag & drop the IR into the appropriate slot (see note above). The image below shows the specific IR location for this patch.
- PLEASE NOTE: If you do not have the IR loaded into the ‘IMPULSES’ column, the patch will not sound correct, even if you have the IR block on – you must drag and drop the IR into the IMPULSES column.
SNAPSHOTS
This patch is designed to be used in Snapshot mode. To enable this mode in your Helix, go to the ‘Footswitches’ section of the Global Settings and select ‘8 Snapshots’ in the ‘Preset Mode Switches’ menu. Here are the snapshots:
- SNAPSHOT 1: Intro/VS1. Intro/verse tone
- SNAPSHOT 2: CH1/Ambi. Ambient swells tone
- SNAPSHOT 3: VS2. Bit more drive than the VS1 tone
- SNAPSHOT 4: CH BIG. This is the main chorus tone, and it uses the Whammy effect.
- How to use the Whammy: in the VS 2 snapshot, the volume block is disengaged. This allows you to move the expression pedal to the off (heel) position before you hit the chorus. In the CH BIG snapshot, the whammy block is engaged and is controlled with the expression pedal (all in EXP 2). Because the volume block is disengaged, you won’t effect volume when you move the expression pedal to control the whammy.
- SNAPSHOT 5: Bridge: Big rhythm tone.
- At the end of the bridge, there is a whammy part to shift the last note up an octave. This snapshot also turns the volume block off, so you can move the expression pedal to heel down during the bridge, and then switch to the CH Big snap to engage the whammy for the last note.
- SNAPSHOTS 6 – 8: NOT USED
SIGNAL FLOW AND EFFECTS
Here is the signal flow and effects:
- Input
- Volume (log curve) – mapped to EXP 2
- Kinky Comp – not mapped to a switch, always on
- Pitch Wham – mapped to switch labeled ‘Pitch Wham’
- Minotaur – Klon OD – mapped to switch labeled ‘Klon’
- Compulsive Drive – OCD Distortion – mapped to switch labeled ‘OCD’
- Stupor OD – mapped to switch labeled ‘SD-1’
- Amps: AC Fawn Nrm, Brit J45 Brt
- Cab/IR
- Vintage Digital – Dotted 8th note delay – mapped to switch labeled ‘1/8d DLY’
- Transistor Tape Delay – Quarter note delay – mapped to switch labeled ‘1/4 DLY’
- Vintage Digital Delay – 1/8 dotted delay – mapped to switch labeled ‘1/8d DLY’
- Hall verb – ‘always on’ type reverb – mapped to switch labeled ‘Hall’
- Glitz Verb – big modulated verb – mapped to switch labeled “Big Verb (Mod)”
- Multitap 4 Delay – Big ambient delay – mapped to switch labeled ‘Ambient/Swells’
- Glitz Verb – mapped to switch labeled ‘Swells’
- Cali Q Graphic – always on EQ – not mapped to a switch
- Looper (6 button) – mapped to switch labeled ‘Looper’
USAGE
This patch is meant to be used snapshot mode, but you can switch to stomp at any time to get to the individual effects. We recommend setting up your Helix to use all ten stomps. The Helix LT does not allow 10-button stomp mode, so you’ll have to re-arrange the button assignments to suite your preferences.
STEREO:
Everything after the cab block runs in stereo. The delays are mono, but they are panned using the mixer block. All the verbs and effects after the delays are stereo effects. If you are able to run stereo, the wet effects will sound bigger and better. If you only use the L/Mono output of the Helix, everything will be summed to mono automatically. NOTE: Do not use just the Right output of the helix – some of the delays will not be audible if you do this.
DIRT PEDALS:
Feel free to stack drive pedals for bigger sounds. For a lead tone, we like the 808 into the OCD.
DELAYS:
The dotted 8th delay is in parallel with the quarter delay, so they’ll be more rhythmic when used together.
SWELLS:
Hit the ‘Swells’ button to turn on the Cosmos echo with big ambient reverb.
EQ AT THE END OF THE CHAIN?:
Typically when you record guitar parts in the studio, you’ll put EQ and compression on the final tone. We’ve replicated the EQ in this patch. You can use the Cali Q Graphic block for final tone shaping. See below for recommended settings.
MAKING ADJUSTMENTS FOR YOUR SETUP
SETTING THE PATCH UP FOR YOUR GUITAR
All guitars are different, so you may want to make changes to suite your playing style and guitar. We set this up with a variety of guitars, including both single coils and humbuckers (primarily a Telecaster style guitar). If you’re using a guitar with humbuckers, please refer to the suggested settings below.
We recommend making a copy of the patch and changing the copy just in case you want to revert back to the original.
RECOMMENDED SETTINGS FOR SINGLE COILS:
The version of this patch you initially download is voiced more toward single coils. We built it primarily using a Telecaster style guitar. If you have a humbucker equipped guitar with low-output humbuckers, it should be perfect for your uses too.
RECOMMENDED SETTINGS FOR HUMBUCKERS:
If your guitar has traditional output Humbuckers, try the following changes (we recommend making a copy of the original patch)…
AMP SETTINGS:
- AC30 Fawn Gain: Change to 6.0
- AC30 Fawn Treble: Change to 8.4
- AC30 Fawn Presence: Change to 6.4
- J45 Treble: Change to 9.6
CALI Q GRAPHIC SETTINGS:
- 2200 Hz Slider: Change to 3.0
- 6600 Hz Slider: Change to 1.9
VOLUME CHANGES
If you would like to make this patch louder or quieter without affecting tone, the following adjustments can be made:
“Ch Vol” control on the amp module. This will increase or decrease volume without affecting the tone of the amp. This is the primary level adjustment tool I use for changing patch volumes.
Output block level. Changing the level control on the output block (the very last thing in the signal chain) will increase or decrease overall volume. We typically have this set at zero, but feel free to adjust this as you see fit.
CHANGE LOG
Version 3.0: 2019-10-03
- Changed: Drive settings (better tone)
- Changed: Amp settings (better tone)
- Changed: Delay/verb settings (better tone, better stereo spread)
- Changed: End of chain EQ settings
- Added: Tone Junkie IR Cab (included for free)
Version 2.0: 2018-11-20
- Changed verb settings for FW 2.6
Version 1.0: 2018-07-18


Reviews
There are no reviews yet.